How to Draw a Carving Into a Tree
Rodney is an award-winning multi-media artist and craftsman residing in the Southeastern United States.
Carving Wood Can Be a "Green"
Years ago, I had the bright idea to carve art figures from large chunks of wood that my neighbors would leave by the street after they had cut old-growth trees from their yards. The idea seemed simple enough: Hardwood was expensive to buy, and utilizing the fallen trees of my neighbors would provide me with vast quantities of free hardwood (or so I thought).
Since that time, I have learned that hardwood is expensive for a reason. The lumber companies have invested a great deal of time and resources in removing most of the moisture content from the wood. This process is very slow, and if it isn't done correctly, the quality of the wood will suffer and sometimes make the wood impossible to sell.
Consider Moisture Content
The hardwood that your neighbor has in his yard after he cuts a tree down is saturated with the moisture content that one would expect in a living tree. As wood carvers, this moisture content is both a blessing and a curse, but it is imperative that you understand how and when to work with this moisture instead of trying to fight the forces of nature. Many fine wood carvings have been destroyed by the separation of wood grain when the water content begins to leave the fibre of the hardwood.
So what's the blessing of high-moisture content in your hardwood? Well, the high-water content will make the wood easier to carve. If you are starting with a cut section of a large tree trunk, the best time to start cutting it into shape is immediately after it is cut. Don't cut it all the way down to the finished size, that would be sure disaster. Instead cut the tree trunk into a rectangular shape that will have the proper dimensions for your planned carving. Once the block of wood is cut, place a generous portion of wax (any kind really) on both ends of the wooden block (the ends that would have been the top and bottom of the tree trunk). Do not place the wax on the sides of the wood block. The reason that this is done is to prevent the tree's moisture from leaving to quickly. The top and bottom of the wood block is the section of the tree where the wood's natural grain will release most of the escaping water content. You may have noticed this phenomenon on chopped firewood that you have stored in an outside bin. It splits at the end, right? The same thing will happen to your carving wood if you do not seal the grain ends, as instructed above.
Seal, Then Wait 1-2 Weeks
After sealing your wood, let it sit for a while. I recommend that you wait at least a week or two (I never said this was a quick process) to allow some of the water to escape slowly from the side of the wood. After this drying period, go ahead and carve your piece down again. This time, go almost to the final cut, but leave an inch or two of thickness above your final cut line. Once again, seal the top and bottom grain lines. Set the work aside in a dry location for several weeks or longer. Again, this waiting period is crucial in letting the wood adjust and release water weight. Keep an eye on it as it dries out. If you see a split developing in an area that will hurt your piece, smother it in wax, forcing the water to move elsewhere to escape.

Begin Carving With a Chainsaw
The actual carving process of the hardwood is an art that will take you some time to master. I started out carving faces, one of the most difficult things to carve. But it was what I loved, so I did it. When you first rough cut your wood, you will need to use a chainsaw. If you have no experience with a chainsaw, get some time in with someone that can teach you. This tool is probably the most dangerous tool that an artist can use. It will buckle, kickback, and surprise you at any time. Nonetheless, if you want to carve wild hardwood, you must master the chainsaw.
Once you have rough cut your shape with the chainsaw, there are other carving tools that will allow you to get the deep curves and cuts that a sculpture will require. Your primary and most basic tool will be the simple hammer and chisel. I have completed entire carvings using just a hammer and chisel after block cutting. It will take forever, but it can be done.
For more modern carving tools, visit your local woodcarving or furniture craft store. There will probably be a large variety of carving-wheel accessories that you can use with a simple four-inch grinder. These things work great. Some are very aggressive cutters, while others don't bite the wood with quite so much force.
Stain and Seal
Once you have carved your piece to completion, apply whatever stain you desire and then seal it with finishing wax as soon as possible. It is very important that you check the piece frequently during the first year and maintain a sealed finish. If you don't, you will likely find that your work of art will develop a wood crack down the middle, even months after finishing it. That kind of surprise really hurts an artist deep after he or she has put in many long hours of carving to finish a piece.
From my personal experience, the longer you can season the wood during the carving process, the better. I usually leave a small section (about the size of a silver dollar) unfinished at the bottom base of my work. This acts as a small drain for any residual moisture still in the piece. I cannot guarantee that this will work for you, but I have had good results with the technique.
Happy Carving!
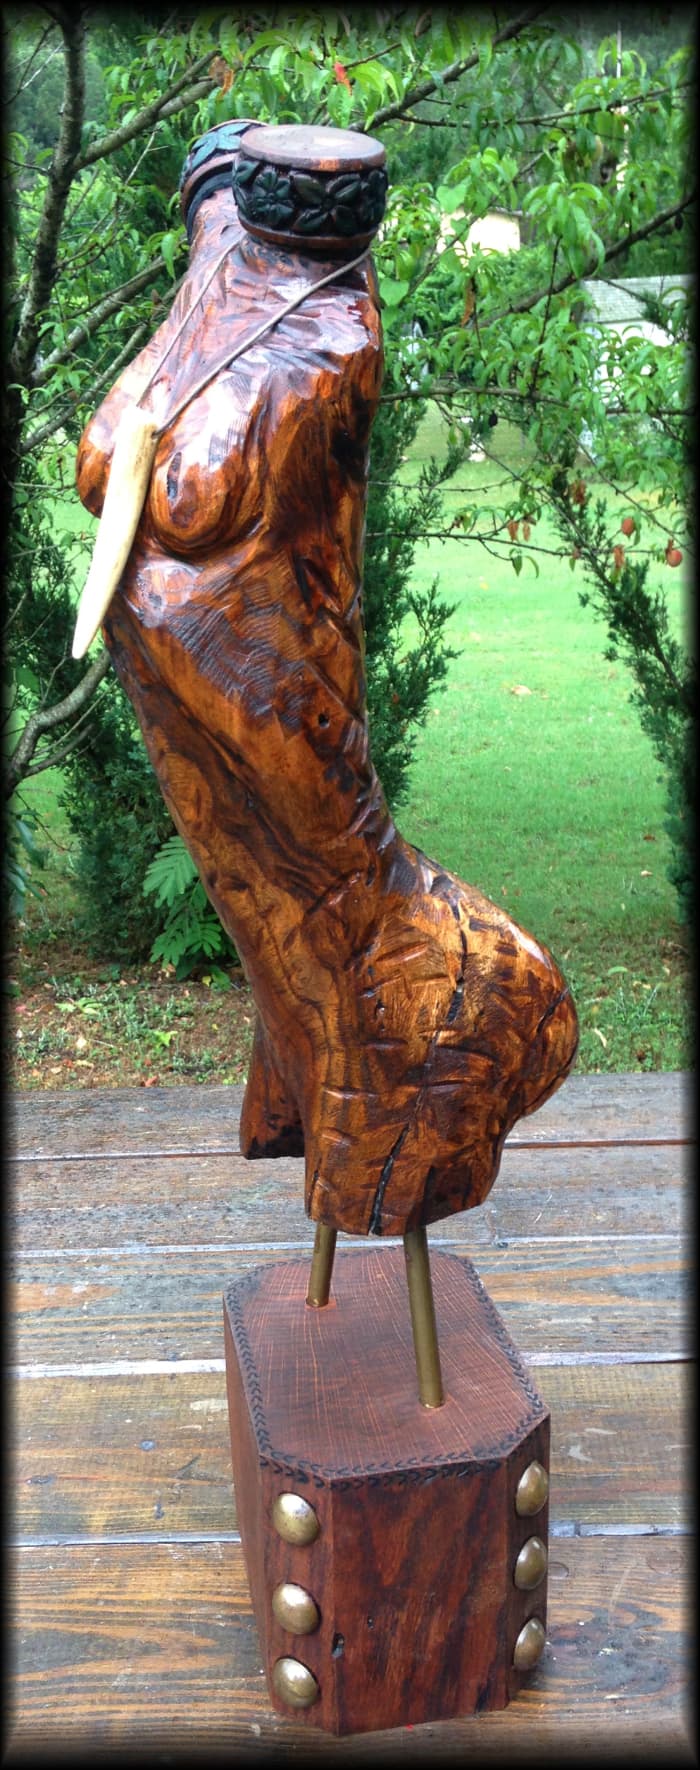
In summary, carving green hardwood is mainly about managing the release of moisture from your wood. Is it tough to do? Absolutely, but as you can see from the photos that I have attached, the rewards of carving hardwood are found in the beauty of your finished piece. Many woodworkers like to work with cottonwood, or other types of soft wood, and that is fine. But for this carver, cottonwood is just not a challenge. A carving from cottonwood may be intricate in detail, but the grain and finish of any softwood will never challenge the beauty of a carved piece of oak or pecan.
Good luck with your carvings, and please remember to keep safety first when working with any power tool. A dollar spent on safety is the best investment any artist or craftsman can make.
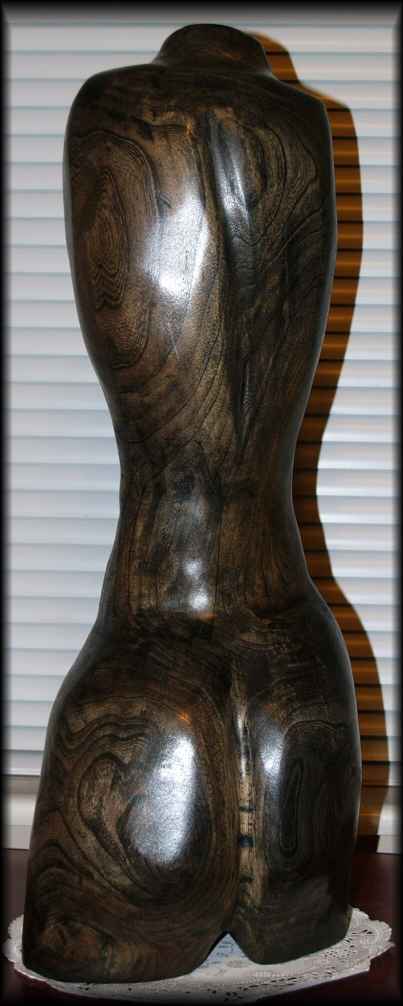
Subtle curves add realism
Scroll to Continue
Read More From Feltmagnet
Questions & Answers
Question: Can you carve a stump that's still in the ground?
Answer: Yes, it is done, but I have not done this other than to shape a stump into a simple display support. If you attempt this, I would get an experienced chain-saw sculptor to assist you. It can be very dangerous work and should not be taken lightly.
Rodney C Lawley (author) from Southeastern United States on June 28, 2019:
Hi SKG. Thank you for the kind words. The piece with the antler necklace is 24 inches in height, and the Oak Man face is about 13 inches in height. The figure carving below is much larger, but I am still working on this piece occasionally.
SKG on January 20, 2018:
Very impressed with your work and especially pleased with your tutorial on carving hardwood. I am endeavouring to become a sculptor. What are the dimensions of the pieces displayed? Would appreciate seeing your response.
Rodney C Lawley (author) from Southeastern United States on June 09, 2017:
Thank you for your comment Elizebette. I have no experience carving a live tree or one still rooted in the ground. I wish you the very best of luck with your project.
Elizebette on May 17, 2017:
Thank you for the info. I would love to try it. What can you do with the tree stump still sitting in the ground? Do you do something to kill the tree off first and then after so many months start your process? I am thinking of a 5 year plan for the oak tree in the corner that is getting cut off this coming Friday.
Rodney C Lawley (author) from Southeastern United States on August 11, 2015:
Thank you for your comment jbosh1972.
Jason from Indianapolis, IN. USA on August 09, 2015:
I have seen some great wood sculptures done with chain saw. I never knew about the proper way to get the moisture out of the wood. I wanted to get a chainsaw someday so I can make hardwood charcoal. The information presented here adds to the list of reasons to get a chainsaw.
Rodney C Lawley (author) from Southeastern United States on June 13, 2012:
Sure thing HizChild. Yes you can certainly carve dry wood, but you may not want to hand carve a dry hardwood on your first project. It is very difficult carving aged hardwood when using hand tools such as chisels and knives. But you can do it, and the worries over your piece splintering with age would be much less due to the low water content. Wood may appear to be "Dry" in a fallen tree, but the only way to know the water content for sure would be to buy a meter and test it (the meters are not very expensive). If you are using power tools with no fine detail to cut by hand, the dry wood may not be a problem for you. Sorry, but I have never heard of a silverback tree. Just ask your husband if it is a hardwood tree or a pine of some sort. Try to use wood that has some dark grain to it, as the grain of a white wood will not be as detailed when stained. Just give it a go and use excessive caution with your tools (safety is #1 concern). You can't mess the wood up, as it is a downed tree right? Have fun and good luck on your project.
HizChild on June 12, 2012:
Can I carve wood that is dry? Or does it need to go through the process you have described? I live in the country and have several downed trees.... Some are what my husband would call silverback.
Thanks for this amazing introduction to (for me) a new expression of art!
Rodney C Lawley (author) from Southeastern United States on May 07, 2012:
Yes. Buy a really-big drill press (kidding!). Seriously, I believe that you will encounter many of the same issues that are discussed in the article. Boring the hole will be very labor intensive, but your big enemy will be preventing the wood from splitting once it is cored. If I misunderstood you, and you simply want to use the cored wood for building material, then I see no problems at all. The thinner you cut the oak, the faster the moisture will escape. Just keep it pressed to prevent bending, seal the end grain, and patiently check the moisture content until it is ready to be worked. Try to get the moisture content below 19% before working with it. This can take a very long time. Good luck to you, and than you for the comment.
danyal on May 07, 2012:
I too have a desire to work with oak, my goal is to hollow oak stumps and make tables, shelves, or any thing else that tickels me, any suggestions?
Rodney C Lawley (author) from Southeastern United States on January 29, 2012:
Thank you for the kind words Natalia.
natalia on January 29, 2012:
nice article! very inspiring and insightful.
Rodney C Lawley (author) from Southeastern United States on January 11, 2012:
Thank you for the nice comments. Your work looks great and proves that there are many different ways to create beautiful art from felled hardwood trees.
robinlordowl on January 11, 2012:
thank you for an interesting and helpful article. beautiful skilled carvings, and what wonderful woodgrain
carved a large white oak myself, unfinished and outside seems to have held up ok
will keep on learning thanks again
my work can be seen at owlartstudio.net robin
rodrigueztwentone.blogspot.com
Source: https://feltmagnet.com/crafts/How-to-Carve-Beautiful-Wood-Art-from-Dead-Oak-and-Other-Hardwood-Trees
0 Response to "How to Draw a Carving Into a Tree"
Post a Comment